Sunday, July 8, 2012

Orchid Baby Sandals

I've GOT to show these beautiful little things off!!

Orchid Sandals

They're available for purchase at my Etsy Store
Don't forget to "like" me on Facebook to be the first to learn of my newest products and specials.

Tuesday, July 3, 2012

Homemade Children's Vanilla Toothpaste

My kids ran out of their store bought toothpaste yesterday so I decided to try my hand at making some.  It turned out pretty well...  if we can get past the baking soda taste.  Baking soda has a very strong taste, but it's a great way to clean teeth.  Maybe a stronger spearmint or peppermint extract/oil would cover up the taste a little better?  Maybe that's why almost all store bought toothpastes are some sort of mint or cinnamon flavor. 

Anyway, here's my vanilla toothpaste recipe.  Give it a try... it costs next to nothing and chances are, you've already got the ingredients in your kitchen. 


Children's Toothpaste
3 tbsp baking soda
2 tbsp coconut oil
1 packet sweetener
1 tsp vanilla extract


We will give this one a try for a little while.... Until I find another version of children's toothpaste that may taste a little better, or just cover up the baking soda taste just a little more. 

So here's my first attempt at making my children some toothpaste. If you have any ideas that may work a little better than mine, please let me know!!  

Monday, July 2, 2012

Summer Bloom Headband FREE Pattern

Summer has officially showed up with this crazy drought and some excessive temperatures!  For the past few weeks, the kids and I have been outside, playing in the water, sucking down popcicles and just having some serious fun.  Today is a CHILL day!  I'm catching up on housework, crocheting some orders that have now become seriously behind and enjoying the air conditioning INSIDE the house. 

Well, I decided to actually write a pattern for one of my most popular summertime girly accessories.  Until now, I've made them all from memory without writing the pattern.  For all you crochet lovers out there (whom cannot crochet yourselves) they are only $7 in my Etsy store.  For those of you who know how to crochet (youtube is a GREAT teacher), here's the pattern :)  Enjoy!!!


Summer Bloom Headband

Ch. 4, join with sl st
Rd. 1 – (makes flower center) Ch 1, 12 sc in loop, join with sl st to first sc

Rd. 2 – (makes top layer flower) Ch 1, Working in front loops only. [sc in next sc. Sc, hdc, 3 dc, hdc, sc in next sc.]  Repeat [] 5 times, making 6 petals.  Join with sl st to first sc.

Rd. 3 - Working in back loops (behind 6 petals), [sc in next sc.  Ch 3, sk next st.]  Repeat [] 5 times, making 6 chains.  Join with sl st to first sc.

Rd 4 – (makes bottom layer flower) [Sc, hdc, dc, 3 tr, dc, hdc, sc in loop make by ch 3’s in previous Rd]  Repeat 5 times.  Sl st in first Sc.   

Fasten off with long tail (for sewing flower onto headband)


                                                                       Headband
Make a chain long enough to go around your head when stretched slightly.  Measurements are listed below.

1 dc in each ch. 

At the end of your ch, sl st both ends of headband together. 

Sew flower onto headband on top of place headband joins together. 

Enjoy!!

If you want different color flower petals or a flower center, fasten off previous color and join new color.  Play around with this pattern to create exactly what you like! 

Age                       Headband Circumference (inches)

0-3 Months                               12 ½”

3-6 Months                               14”

6-12 Months                             17”

1-3 Yrs                                      18”

3-7 Yrs                                      19”

7-15 Yrs                                    19 ½”

Adult                                          20”

This chart gives you sizes for appx ages.  Head sizes do vary upon person.  If you want to make a snug fit, measure circumference around head and subtract 1 ½” to get headband circumference. 


If you try this pattern and notice any difficulties understanding it, please let me know!  I'm still very new to this pattern writing thing, as I have always crocheted from memory.  Now that I'm selling multiples in each of my products, I figure a pattern might be handy to have :)  Once again, enjoy!!  These are SUPER cute on babies/girls/ladies of all ages!

Saturday, June 30, 2012

Homemade Shampoo & Body Wash using Castile Soap for my Son

I can't live without my homemade Shaving Cream!!  When I went to visit my mother this week, I left it for her, telling myself I would just make myself some more.  Well, instead of making more tonight when I shaved, I used my old Skintimate.  YUCK!!!  My legs are NOT as soft and I feel like I have alligator skin.  My legs don't feel as smooth, I didn't get a close shave and I miss the velvety feel of my legs after shaving.  You wouldn't think I'd miss my homemade concoction this much.  I used Skintimate for years so I thought I'd be ok going back....  Ummm... No..  I will definitely be making my oh so soft Shaving Cream tomorrow and will never look back!  Mom, hope you know how much I love you!!!  :) 

Enough of the venting....  Let me tell you why I didn't have time to make my scrumptious shaving cream tonight.  While we were on vacation, my son ran out of his shampoo and body wash so I bought him some store bought junk until I got home to make him some homemade goodness.  Tonight, I made some more amazing goodness....  (I'm loving this homemade/natural thing!!  I feel so creative, responsible, a little more earth friendly, as well as pocket friendly :) ) 
DIY Shampoo:
1/2 cup Dr. Bronners Liquid Castile Soap (I have Lavendar)
1/2 cup Tea (green or whatever you wanna use)... brewed 30 mins.
1 Tbsp. Olive Oil
1 tsp. Honey


Now, I'll explain the ingredients.....
-Castile soap is completely natural/organic soap that works wonders.  It has tons of different uses!  Well worth the money...  A little goes a LONG way.
-Tea is an amazing herbal treatment for your hair as well as body.  Chamomile tea works great on blonde hair.  Sage tea works great for dark hair.  You can also use just plain old green tea, black tea (to darken your hair) or typical Lipton tea!  It all works great. 
-Olive Oil nourishes, conditions, improves the strength and elasticity in your hair leaving it healthier and more managable.  It also leaves a clean, invigorated scalp!
-Honey is full of vitamins and nutrients that are great for both your hair and body.  It holds in water giving your hair extra moisture.   


DIY Body Wash:
1 cup Dr. Bronners Liquid Castile Soap
1 cup Water
3 Tbsp Coconut Oil (melted)
5-7 drops of your favorite essential oil(s)


I've read others have had problems getting the castile soap to lather.  This lathers wonderfully.  Both of these soaps (body wash & shampoo) are very thin but you won't have to use much at all.  A tiny bit goes a very long way with these recipes.  They both lather wonderfully and leaves your hair/skin feeling soft, clean and moisturized!  I made these for my 8 year old son so they're very mild.  I plan to make another version with coconut milk for myself soon!! 

I hope these help you in your discovery into making your own, natural bath products!  If you have any questions or want to leave feedback after you try, feel free to leave a message.  Don't forget to sign up to get my email updates to the right! 

Thursday, June 14, 2012

Gotta buy more bathroom cleaner? DON'T! Clean your bathroom the homemade way.


Today, I decided to tackle my bathrooms...  I've been putting it off all week because I just knew it was going to take me hours with sponges, rags, toilet cleaner, tub/shower cleaner, glass cleaner, disinfectant, tile/grout cleaner, etc.  The list goes on and on and on and on.......  With 5 people in my house, 3 being boys, the bathrooms get disgusting.  I generally clean the bathrooms once a week, minus the typical pickup, but that still doesn't seem like enough and the cost of cleaners gets outrageous. 

Enough is ENOUGH....   Back before they had all these millions of different types of cleaners, people still had clean bathrooms, right??  I remember going to my grandmother's house and it always being so clean and fresh but I never saw tons of chemical filled cleaners.  She always had vinegar and baking soda though.  With remembering that, here's what I came up with to clean my bathroom:

Tub/Shower: 50/50 water & vinegar.  Mix in a spray bottle, spray and wipe clean.  It easily wipes soap scum away.  If you have any real tough spots, make a paste of baking soda & water to apply to the stain OR wet stain with water, sprinkle baking soda to area & spray with vinegar solution.  When it foams, scrub the area with your micro fiber sponge/towel. 
Countertops: Same as Tub/Shower.  Half vinegar and Half water.
Toilets: Sprinkle some Baking Soda down the drain (you won't need much), pour in 1 cup of white, distilled vinegar.  It will foam up (like your old volcano science project as a child).  Scrub the inside of your toilet with your toilet brush and the foam.  Your toilet will sparkle! I use the vinegar/water spray to clean the outside of the toilet.
Mirrors: Vinegar & Water spray.  Clean with pieces of an old T-Shirt or Micro Fiber Sponges or Towels.  Paper towels don't work so well using this cleaning method.  This works better than my Windex!! 
Floors: I have tile floor in my bathrooms.  50/50 vinegar & water works GREAT at cleaning the spots/dirt while leaving my floor sparkling

To sum it up, to clean your bathroom you need this:
Vinegar, Baking Soda, Water, micro fiber towel/sponge (essential oils, optional) 
That's it!  Vinegar disinfects as it cleans, naturally, so you won't need to use any extra antibacterial or disinfectant cleaners. 

If you want to leave your bathroom smelling nicely after the vinegar dries & the pickle smell goes away, simply add 10-15 drops of your favorite essential oil to your spray bottle.  The pickly vinegar smell will disappear as it dries, leaving the great scent of your essential oil.  I, personally, don't like citrus much and love the smell of lavendar, so that's what I used.  I love having the relaxing, lingering smell of lavendar floating through my house :) 

If you try this and have comments, suggestions or anything to add, I'd love to hear from you! 

If you like my posts, don't forget to sign up to get my posts via email by putting your email in the "follow by email" area to the right.  I promise, your email goes nowhere but here.  Your email is confidential  :) 

Sunday, June 10, 2012

In search of a new DIY Fabric Softener that SMELLS good

My last Fabric Softener Recipe works great but isn't exactly what I like/want for my own laundry so I've been searching for something new to use during my rinse cycle on laundry days. 

My latest Fabric Softener used hair conditioner as one of the ingredients.  After researching ingredients in my hair conditioner, I do NOT plan on purchasing anymore when my Pantene runs out.  I will be using an all natural, safe way to condition my hair..  More on that when I run out of my current conditioner. 

After tons of research, I think I've found another GREAT way to make my softener.  Vinegar has been proven to be excellent for clothes.  It helps keep lint from attaching to clothes, it removes soap residue, it helps remove odors from clothing and helps boost your detergent power among many other advantages.  Google it... You'll see for yourself! 

Baking soda helps soak up odors and helps regulate the ph level in your laundry rinse water keeping it from becoming to acidic or alkaline.  Adding it to your rinse cycle is supposed to act as a balance to suspend detergent or mineral deposits which leave clothes feeling stiff. 

Add some water & essential oil and I should have a "better than I've ever imagined softener"... right??  No....

I ALMOST fell for using both of these in a fabric softener... BUT... I remembered, when both are mixed together, they react, foam up, leaving nothing more than a little salty water.  Remember mixing the two in your clay volcano when you were a kid??  It makes for some awesome lava...   If you're googling ways to make your own fabric softener & you find one that tells you to mix these two ingredients, remember you're only wasting your vinegar & baking soda...  Might as well just throw it in the trash now.  Seperately, they work fantastic.  Together, they end up canceling each other's magic, leaving you with nothing more miraculous than salty water..  

For right now, I think I'm going to try using my white distilled vinegar & adding some of my "linen" essential oil to it.  I use the baking soda in my homemade laundry detergent anyway...  Maybe the use of both of them, at different times, will work great!  Let's just hope the laundry ends up with a good, clean, linen scent, just how I like it!!   

Anyone else have any ideas???  I'd LOVE to hear what's working for you!   

Update: This works GREAT!!  I simply use white distilled vinegar and add my essential oil to it.  Appx 15-20 drops per half gallon (that's enough for me).  I use appx 1 cup of the mixture per load of laundry.  My laundry comes out SO soft and smells great!  Give it a try! 

Saturday, June 9, 2012

Baking Soda & Peroxide... after my Stove Fire

My husband was cooking while letting me relax and read a little of the book I've been reading. (Btw, the Hunger Games trilogy is AMAZING!  If you haven't read it yet, you should!  I can't put it down.)  Suddenly he calls, "BABE... COME HELP!!".  I run from our living room to our kitchen to see what!?  A Stove Fire!  AHHH! 

Those of you who have been following my blog know I usually add visuals of my posts.  Sorry....  No visual of my stove fire.  I was a little too busy trying to PUT OUT THE FIRE

Just so you know, everything's fine.  No damage was done - to anything - at all.  Just a little visual damage...  Just needs to be cleaned up a little... 


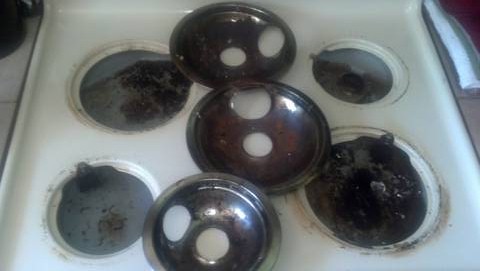
After the fire, I got to wondering what caused the fire.  Had my husband spilled something on the burner??  No...    How long had it been since this stove, under the cosmetic top, had been cleaned?  I've cleaned that stove daily (most days several times a day) since we moved here a few months back.  Surely they had it cleaned pretty well before we moved in, right??   WRONG!!  I took the stove top apart and OMG that thing was DISGUSTING!!  No WONDER IT CAUGHT ON FIRE! "Just needs to be cleaned a little??"  Uhh....  How about, "I'm gonna have to give this thing the scrub down of my life because, surely, it's never been cleaned!". 
This is actually pretty embarassing.  I've been cooking just above a build up of other people's filth!

I need something stronger than my normal vinegar/water mixture.  I bring out the hydrogen peroxide & baking soda :)  I mix it together in a bowl to make a paste to a consistency I like and rub it all over everything with the dark, black, burn marks on it!


I let it sit basically ALL DAY!  It was several hours at least.......
This stuff works AMAZING!
This is my new, Miracle Cleaner!!
Just look at my stove now...
Besides the stove being pretty much ancient, it's beautiful!!  And CLEAN!!
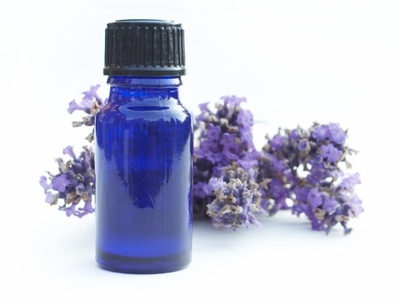