Thursday, May 31, 2012

Flea Killer for your Carpet

Yesterday, I wrote about flea prevention for your dog with my Lemon Water.  If you have an inside/outside dog like mine, those fleas get brought inside your house.  Even if you don't have a dog, people entering and leaving your house can bring in fleas.  YUCK

I once thought it was nearly impossible to get rid of the fleas in your home.  They live and breed in your carpet.  They seem to multiply overnight, no matter what you use/do. 

NOT ANYMORE....  NOT IN MY HOME, AT LEAST

Salt dehydrates fleas.  Yes, normal table salt.  Here are your magic ingredients for killing the fleas that infest your carpet:

*A Vacuum
*Salt                                
                                          
:)    Think you can handle this difficult recipe??    :) 

This is SO much cheaper than the flea killers I use to buy at the store.  I feel way better about pouring it on my carpets, where my children play because there are no hidden or unknown chemicals.  It also WORKS!  There are no worries about spending money on something wondering IF it will work or not.  Chances are, most or all of you reading this will have salt in your cabinets right now!

DIRECTIONS: Simply sprinkle salt all over your carpet.  Put it on your furniture, mattresses, etc if you have fleas there as well!  No worries about it hurting you!  Leave it on the carpet for a few hours.  Give it time to dehydrate and KILL all those fleas.  I left mine in overnight.  After a few hours, vacuum up all the salt. 

You'll be suprised to see how many fleas vacuum up with the salt.  I emptied my "trash container" on my vacuum into my trashcan and the white salt was littered with hundreds of tiny black specks (fleas).  And seriously, my infestation was NOT BAD... So I thought! 

Wednesday, May 30, 2012

Flea Prevention for your Dog

Since we moved to the country earlier this year, my poor dog has been suffering from fleas & ticks.  We've tried all sorts of flea/tick prevention medicines but Sybil (our dog) has been eaten up!  This may be the result of a lack of a winter this past season...  They didn't get frozen and die off! (So they say here in the South.) 

Anyway, I got to reading about all of the different chemicals on all those store bought medicines and was pretty disappointed.  Do I really want to put these on my dog?  Especially since NONE of them seem to be working very well at all! 

I started looking online for natural things fleas & ticks absolutely loathe.  Everything I read about said Citrus......  Really?  I looked into my fridge and saw a lemon.  I figured it was worth a try.. soooo....  I sliced my lemon.  I boiled 2 cups of boiled water then removed it from the heat.  You then place the sliced lemon in the water and cover it.  6-8 hours later, I put my lemon water into a spray bottle. 


Before you spray your dog with your lemon water, bathe her with Dawn.  Dawn immediately kills fleas.  Ticks don't like it much either.  Most of the ticks I saw on my dog kinda just let go.  After I bathed her, I sprayed her with the lemon water.  Make sure you spray your dog enough to make the skin wet under all the hair. 

Sybil is a 9 month old Boxer so she's a rather large dog and I still had over half the mix left.  If you have left over mix, you can keep it in the spray bottle, refridgerate it or freeze it.  No matter what you do, it'll still work for another use. 

Honestly, I haven't seen my dog so happy since we moved here! 

Ohhhh....  I told my mother in law about it last weekend.  I have a nephew who seems to attract fleas no matter where he is!  If he's outside, they'll attack him!  Poor kid must have sugar for blood...  Anyway, she sprayed him with my little lemon water recipe before he went out to play (they live in the country also) and guess what??  Not a single flea bite!! 

So, here's you a VERY CHEAP, all natural, VERY EASY flea/tick prevention that's safe for pets AND humans!! 

Thursday, May 24, 2012

DIY Fabric Softener

This weekend, we finally picked our HE washer and dryer up from my mother's house.  We had left them there until we could figure out something to do with the washer and dryer that were already in our new house. 


I started thinking......   I need some fabric softener.  Being the DIY crazy lady I've turned into lately, I decided to google different recipes to make my own. 


I found several different recipes but here's what I put together: 
3 cups warm water
1 1/2 cups white vinegar      
1 cup conditioner
1 Storage Container (I used a leftover spring water bottle..  Simply rubbed peanut butter over the sticky label, let it sit for about 15 minutes and scrubbed with a wet sponge to remove the glue)


The water is better warm so it helps dissolve the conditioner.


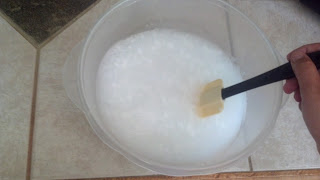
*You simply add all ingredients into a bowl and stir* 

 I had to use a slightly larger bowl than the original one in the first picture :)  Looks like I under-estimated how much I was making. 

Pour it into whatever container you wish you store your fabric softener into... 
Voila..  Fabric Softener!!  It looks great, smells great... has a great consistency.  Today, I'm doing several loads of laundry.  I'll update after I do a few loads and tell you what I think!  The process was simple enough.  Can it really be that easy to make good fabric softener?  I'll let you know in a little bit..

Btw: If you want to make a little more, just double all ingredients.  Even for the mathmatically challenged, this one should be pretty easy to figure out :)


UPDATE:  I've finished about 4 loads of laundry since I made the fabric softener.  It works great as far as keeping the clothes soft and static free.  It has a nice, slight scent.  For those of you who don't like a strong scent, this would be perfect!  For me, I like a little stronger scent.  I may try to add a little scent into the next batch I make.  Maybe some lavender oil. 

Tuesday, May 15, 2012

Greasy Kitchen?


I went into my kitchen to do the normal cleaning up. You know, the putting the dishes into the dishwasher, sweeping the floor, wiping the counters, etc. What did I see when I was wiping the counters? Nasty, yucky grease covering ALL of my "sit on the counter" appliances. How did I not see this when I was packing them all up for my big move earlier this year?  It couldn't have built up just since I've lived here, could it??  (Less than 4 months)


YUCK!!!!!!!!!!!           

                             
That's embarrassing!    Ok... so It's got a little dust on it too.  My new house gets crazy dusty!  Maybe it's a living in the country thing..... 


Anyway, I knew I had to do something about it so I brought out my store bought cleaner & scrubbed & scrubbed & scrubbed.  I'm not one with much patience so I got aggravated pretty quickly.  I DESPISE scrubbing so hard and so long to do such a simple task.  I can't keep my mind from wandering everything else I could possibly be doing to be more effective.  Anyway, back to my cleaner...   "Dissolves grease"???  Right... (get my sarcasm?)      

I pulled out my handy vinegar/water mix. 


That stuff is making me a tried & true believer on homemade, DIY cleaners!  Not only are they safer and cheaper, but they actually work better!!  I just sprayed it all over EVERYTHING and let it sit while I swept the floors & started the dishwasher.  Maybe 5 minutes??  When I came back and started "scrubbing", there was no scrubbing to be done.  I simply wiped away the greasy filth & ended up with amazing, shiny mini appliances and spice rack. 

 Sooooooo Pretty now! 


My kitchen cabinets will eventually be full of nothing but cleaners I've made myself!  Since I'm still new to all this DIY stuff, I've got lots of left over store bought cleaners.  I simply don't see myself buying anymore though.  I use to have to buy a different cleaner for EVERYTHING!  Bathroom cleaner, kitchen cleaner, floor cleaner, cleaner with a degreaser in it, disinfectant cleaner, oven cleaners...  And it cost a mini fortune keeping up with all of it!  All I've used for the past 2 weeks has been my vinegar/water cleaner & it barely even cost me a few cents! 

For those of you who may have missed my earlier post on mixing the vinegar/water cleaner, here goes...  1 part white, distilled vinegar, 2 parts water.  (Ex. 1 cup vinegar, 2 cups water).  Put it in a spray bottle, make sure you label it and there ya go!  The cheapest, easiest to use, safest and best working general cleaner you will ever use!  That's my opinion anyway.... 


Wednesday, May 9, 2012

Amy Adams Photography

Anyone other than me ever just get sick of taking and editing photos?

Amy Adam's Photography, https://www.facebook.com/pages/Amy-Adams-Photography/317082894968543?ref=ts, has been amazing to me and my business so this is a blog entry strictly showing off her amazing abilities and thanking her for everything she's done! 

First of all, she's taken beautiful pictures of a BEAUTIFUL baby girl wearing my Petals Newborn Hat.  <3 <3 <3 <3 <3

Omgoodness... Isn't that just plain adorable?
I just wanna squeeze this little monkey

Seriously....  The baby makes that hat look good :)

Enough of the baby hype before I start going baby crazy...  I've got 3 already.  I do NOT need any more!  She's made me a beautiful cover photo for my facebook fan page.
AND she's taken dull, nothing special, ordinary camera phone pictures and made them look so much better.  I don't have the patience to do this type of thing...  .  (Yet somehow I have the patience to crochet for hours??  lol...) 

A big THANK YOU Amy :) 

Thursday, May 3, 2012

Spring Flower Clip

I figure it may be about time to write something about crochet.  :)   Maybe a free pattern??? 

Spring Flower Clip

Use 5mm crochet hook & worsted weight yarn
1 Button & alligator clip

Rd 1 - Ch 3, join with sl st
Rd 2 - Ch 1, 6 sc in circle, join with sl in first sc
Rd 3 - Ch 1, Working in front loop of each st, *sc, hdc, 3dc, hdc, sc in next st. Sl st next st* Repeat 4 times to create 5 petals.  Join with sl in first sc.
Rd 4 - Working in back loop of each st (behind Rd 3), *sc, ch 3, sc* behind each petal to create 5 loops behind each petal.
Rd 5 - *sc, hdc, dc, 3tc, dc, hdc, sc* in each loop to create 5 petals.  Join with sl st to first sc.
Fasten off, weave in ends.
Hot Glue the button in the center of the flower.
Hot Glue an alligator clip to the back of the flower.
(I wrap each side of the alligator clip with yarn and hot glue it in place as I'm wrapping.  This keeps the alligator clip from slipping in the hair when being worn.)
They even look adorable on adults!

I am in NO way a professional pattern writer so if this is hard to understand....  Oops!!  I'm sorry!!  haha...  I'll accept any constructive criticism you may have :)  

Have a TERRIFIC day! 


Wednesday, May 2, 2012

DIY Cooking Spray

www.onegoodthingbyjillee.com has got me looking at the things I'm cleaning with, putting on my body & IN my body.  I saw her post where she was making her own cooking spray and it got me wondering.... What's IN MY cooking spray?  I took out my can of cooking spray...  Ingredients: Canola oil, Soy Lecithin (??? ), Dimethyl Silicone (Seriously??  I'm spraying SILICONE on my food???), propellant (again, SERIOUSLY?), added Fat.  Why am I putting this crap in my family's bodies?  That's where I decided to follow Jillee....  I'm making my own cooking spray!! 

I followed Jillee's advice here in her directions.

It's SO SIMPLE!!!


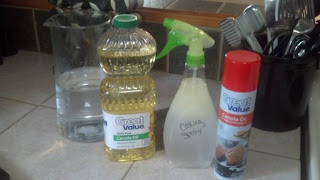
1 part olive or canola oil to 5 parts water..  Bam, cooking spray!  Just put it in a spray bottle.  Now we all know water & oil separate so just give the bottle a quick shake before you use it.  Make sure you label all of your homemade items.  You don't want to be getting your cooking spray mixed up with your vinegar/water cleaning solution.  Although it won't hurt you, it probably won't taste very great! 

My cooking spray has 2 VERY simple ingredients:  Water, Oil.
Commercial Cooking spray: Oil, Soy Lecithin, Dimethyl Silicone, Propellant, Added Fat.   UGHHHH!!


Which spray would you rather put into your body?

Tuesday, May 1, 2012

A Sparkling Kitchen

So, I haven't said a whole lot about anything....  Not even myself...  BUT, here lately, I've been on this huge, DIY (Do It Yourself) kick.  At the beginning of this year (2012), I decided I was going to make a lifestyle change to just be healthier in general.  Not only have I changed my family's diet by much less eating out and learning how to cook, but now, I'm working on making my own cleaning supplies.  I've got tons of ideas, but I'll share just one for now.


My miracle kitchen/bathroom cleaner and sanitizer.  Some of you may already know about this or may have already tried it, but, with me being me, I'm SUPER proud of myself to have found this.

Supplies:
2 spray bottles
hydrogen peroxide
white distilled vinegar
water


That's it!!  You can pick up a large bottle of hydrogen peroxide for around $2 & a gallon of vinegar for about $2.50.  My spray bottles were $1.50 each at WalMart. 

Here's what you do:
I took one of the spray bottle tops & put it on top of the hydrogen peroxide bottle.  I 2 parts water 1 part vinegar in the other spray bottle. (Ex. 2 cups water, 1 cup vinegar).  My bottle had markers on it so it was pretty difficult to screw up....  I filled vinegar up to the 2-1 line and filled the rest up with water. 

I've cleaned my kitchen & diningroom and wow...  Things look GREAT!!  Now, off to the bathroom.....